


I'M ALIVE!! Again, I've been so MIA, and I've missed you! I have this thing called a day-job, and sometimes I'm sent on business trips. Away from my family, away from my sewing machine, away from blogland. Le sigh. It's been a long month or so. I hope my absence hasn't made me completely obselete!
But I'm back. And I have a fun project to share with you! I'm not a quilter, but I pinned this binding trick by The Crafting Chicks:

I should back up a bit - when my mom was visiting over the 4th of July, I dragged her to G Street, since we were shopping in the general vicinity. As we were browsing, a particular fabric caught her eye. She did a double take, but it was, indeed, a fabric featuring the characters from my son's absolute favorite TV show: Yo Gabba Gabba (Dah-bah?!). I pounced. I bought more than I needed. When we got home, I layed it on the ground, and my son faceplanted on it, giggling and yelling "DAAHBAAAAH!" Just his excitement alone gave me the motivation to get to work on a blankie for him.
I found the right Minky for the job from Minky Delight Fabrics and off I went to cut out the blanket. Sidenote - do you know that there is not really a standard for baby blanket dimensions? I found that very frustrating. I'm a pattern girl, and if there isn't a pattern, give me exact, correct, precise dimensions for me to go on. My Google Search left me with too many options.
I ended up cutting the Minky and batting to be 30" wide X 36" long and the Gabba fabric to extend 2.5" from each side - I wanted a 2" binding on the green side. This is where I deviated from The Crafting Chicks method - I didn't want to have a thick binding (top fabric + Minky + batting folded over itself twice) so I eliminated the bulk by just folding over the top Gabba fabric.

I took the Gabba fabric and pressed 1/2" under on all sides.

I then folded that edge under again 2.5".

In order to get the right fit, I unfolded it and placed my Minky and batting inside. I trimmed an excess fabric that overlapped the pressed edge.

I improvised the next few steps, and I tried to document it in photographs. I first folded in one of the corner edges - the triangle symbolizes where the folded fabric originally was - it's now been folded inside. This eliminated the appearance of the double layer of fabric.

It looked like this, once folded under - much cleaner.

I pinned the self-binding to the Minky and sewed 1/8 inch from the edge of the Gabba fabric.

This is where I fudged a binded corner. I took the remaining square edge/flap, and tucked a triangle inside. The black triangle below symbolizes where the original fabric originally was. Like I said, I improvised. Fake it til you make it, right?

I finished by edge-stitching all the way around the outside, and then tacking the diagonal corners down.

 |
| What can I say, I seek progress rather than perfection! :-) |

It's not my best work, but my son loves it, and that's all that really matters, right?


******
Remember how I said I bought too much of the Yo Gabba Gabba fabric? As luck would have it, there was just enough to make a pair of Huck Finn pants from Weekend Sewing by Heather Ross! Since the 24M size was too short for my 19M guy, I lengthened the pattern by 2 inches. |
| UHaul packing paper makes GREAT pattern tracing paper. More durable than tissue paper, but just transparent enough to see the pattern lines underneath. Who knew?! |

The fabric on the blanket was loud, and on the pants it's even louder. So ridiculously cute!

I put him in the pants and he did an adorable 19-month dance, chanting "Daahbaah, Dahbah, Dahbah!!" which is really all I need to feel like an accomplished human in this world.
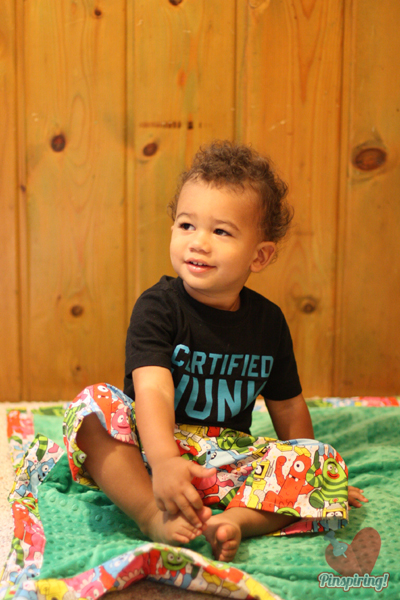 |
| Yes, he is a Certified Hunk. |
I really need to make a ton of these pants out of the fabric scraps that I've been hoarding over the years. Friends with babies better look out. They might just end up with a random pair of Huck Finn pants in their mailbox in the coming months!


Oh I love it, matching jammies as well, I bet you have a hard time taking them off to wash!
ReplyDeleteAdorable! Your son, the pants and the blanket!!
ReplyDeleteYour little guy is adorable! Love the pants and blanket. :-)
ReplyDelete