Monday, July 16, 2012

New Take on an Old Fave

I can't believe I did it.  I'd been considering doing it for some time, but I was really afraid.  But I finally did it.  I cut apart a dress that has been in my wardrobe since I was a Junior in High School.  That was 1995.  Like, before I knew the internet beyond AOL "You've Got Mail" even existed. 

I wore this dress regularly up until the end of summer of 2010.  Since then, it had lost its luster for me.  I'm not sure what happened, it just didn't do it for me anymore.  But I loved the fabric, and it had done me well for so many years, I just couldn't thrift or swap it.

I pinned this top months ago from How Joyful, and I knew it would be the inspiration for this dress refashion, if I could ever build up the courage to take a scissors to it.

See my note at the bottom??  I had plans.
I even had plans to use this shirring technique from Make It - Love It, but more about that later.

So without further ado, here was the original.


This was a Gap dress.  Check out the old school label:


I put it on and pinned the length that I wanted.  Once I cut it, I realized I could probably make a skirt out of the remaining fabric!


But that's for another post.

I tried it on, and I probably could have cut the top an inch longer in order to accomodate a double-fold hem.  It's not that it is a crop-top length by any means, but I like my camis/tanks to hang a bit below the waistband of my pants. 

I opted to do just a single-fold hem, which is so unprofessional, but how often do people come and examine your hems anyhow?


Also, the fabric is a nice rayon, and while very slippery, it doesn't fray too much.

Like I mentioned above, I originally planned to make a shirred gathered waist.  But after I hemmed the top and tried it on, I really loved how it hung on me.  The top was done!


I'm beyond pleased with how it turned out.  I was so afraid that I would regret cutting it apart and trying something new.  I will always love this fabric, and I'm so glad I have found a way to revive it and make it a permanent fixture in my wardrobe.

Photobucket

Creative Itch Home is where the heart is. - Link it up! - Wednesdays - HomesteadSimple.com PWW Button Visit thecsiproject.com Photobucket freckled laundry The Shabby Nest I Heart Nap Time Photobucket
Pin It!

Saturday, June 30, 2012

DIY Brownie Bites


You've had the Whole Foods Brownie Bites, right?  They are amazing because A) they are brownies and B) they are the perfect size and C) there is edge all the way around the brownie.  When left in a room with a pan of brownies, I cannot restrain myself.  That pan of brownies is as good as gone...and the corners and edges will disappear first.  I don't know what it is about a brownie edge...just the right amount of crispyness...so delicious....

Woah.  Brownie fantasy.

After realizing that I could bake pretty much anything bake-able in a muffin tin, I realized I could make my own Brownie Bites!  My whole world has since been transformed (well, my whole brownie baking world, but sometimes that feels like my whole world).

Collect the necessary ingredients.  Box of your favorite brownie mix, and whatever else the box says you need:


Mix it all together, and grease your muffin tin really well in each cup compartment.  Then place spoonfuls of the brownie batter in to each cup, almost to the top.  The batter will rise some, so don't overfill.


For baking, set your oven based on the instructions on the box.  As for timing, I start mine off at 20 minutes, and then dip a toothpick in the center of one.  If it comes out clean with no batter residue, then they are done.  If not, then keep them in the oven, checking them every 5 minutes until the toothpick comes out clean.


When they are done, let them cool completely.  I know, it's hard to wait that long.  But this guarantees that they will stay intact when you jimmy them out of the cups.  I slide a plastic knife down  and then along the edge of the cup.  They normally free themselves easily.


Once they are out of the muffin tin, I can't promise they will stick around long.  I call each one an individual serving size, but I've been known to eat more than the recommended serving size in one sitting.  What can I say, brownie edges are my weakness, and you get 360 degrees of brownie edge on each of these.  Enjoy!


Photobucket

Pin It!

Tuesday, June 19, 2012

Diaper Motorcycle

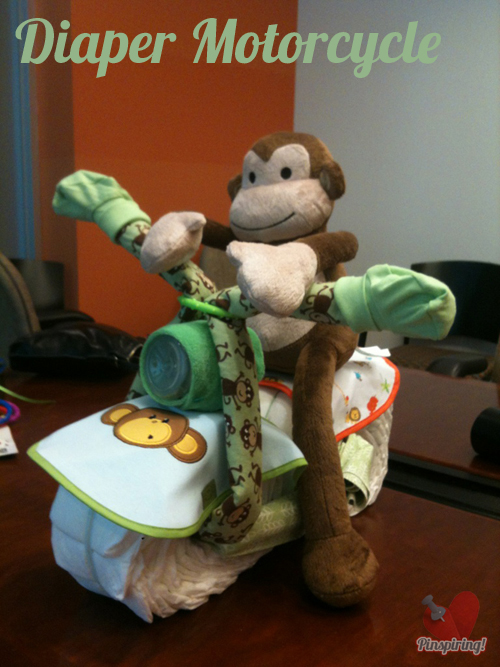
My last post was about a baby gift set I made for my girl Natalie and her little one's (who STILL hasn't made his debut yet!  Foot tapping....) shower.  Well, being the matchmaker that I am, I actually set Natalie up with Michael, a fellow I work with.  They fell in love, and here we are...waiting...for little Max....any day now!!  Anyhow, we also threw a work shower for the soon-to-be-parents.  We work in transportation safety, and Michael works on motorcycle safety in particular.  While doing some research, my colleague came across this masterpiece with an awesome tutorial by SweetAprils:

 
In the words of Rachel Zoe, "I die."  For realz?  It's a DIAPER MOTORCYCLE.  Could this be any more perfect for Michael?  And could it be any more awesome in general?  I think not. 

After letting out a few squees and giggles from our cubicles, we decided it had to be done.  I took to Babies R Us and bought the necessary supplies.


I must apologize here for the quality and limited number of photos.  We did the assembly at my office with limited time.  It was just not the appropriate place to be taking pretty blog photos.  So iPhone quality photos is what you get.  Hopefully more friends will have babies and I will have more opportunities to make more of these and take fancy photos.

Michael and Natalie's nursery is a jungle theme, so I chose the monkey to be our motorcycle rider.

We followed SweetApril's extremely detailed tutorial, which proved very helpful and super easy to follow. 

A few areas of the motorcycle frame needed stablizing, so we used some straight pins here and there.  What we ended up with was this adorable composition:


Sadly we couldn't find a helmet small enough for this little monkey...otherwise he would be ready to ride! 
Photobucket

PWW Button Katie's Nesting Spot Photobucket
  Whatcha Got Weekend @ Lolly Jane
Pin It!